Centralized/ De-Centralized Internet Access and Inter-branch WAN Connectivity for Enterprises


Centralized/ De-Centralized Internet Access and Inter-branch WAN Connectivity for Enterprises

Most of the companies have multiple branches. And almost all of them connect to each other over WAN (Wide Area Network). Each branch needs Internet connectivity as well. So, what kind of connectivity architecture do companies adopt? Which architecture is better – MPLS WAN Connectivity and Centralized Internet Access (or) De-centralized Internet Access at each branch, while still connecting to other branches using MPLS Links (or) Virtual Private Networks using just Internet Leased Lines at all branches? We will find out, in this article.
A number of companies still have Point to Point Leased Lines to connect to other branches but we are not considering that architecture here as MPLS connectivity is clearly a better (and a more cost effective) option these days – Click here to read the advantages of MPLS Circuits over point to point Leased Lines. Also, click here if you are new to Internet Leased Lines – We have listed their advantages over broadband connectivity for Internet Access.

MPLS WAN Connectivity and Centralized Internet Access

MPLS WAN Connectivity and Centralized Internet Access - Architecture DiagramIn this architecture, each branch including the head office are connected to each other (in a mesh, actually) through the MPLS Circuits. Just one MPLS circuit is enough for one location though. The Internet Leased Line is taken at the head office and all the individual branches can access Internet by accessing the head office network first (through MPLS network) and then accessing the Internet Leased Line from there. So, the branches do not have direct (individual) Internet connections.
The main advantage of this architecture is the centralization of the Internet Access Policies and the Security Policies – They can be applied from one location in the head office, which gives more control to the head office over what is/ can be accessed over the entire network. This is also a cost effective option, as the Internet at the head office is shared between the multiple branches and since companies pay in full for the capacity ordered (2 Mbps for example), the under utilization of available bandwidth at any point of time can be minimized.
The main disadvantage is that the speed of Internet access at the branches can be quite slow (especially during peak access times). Since the same circuit is carrying both Internet traffic as well as real time traffic like voice and video, data traffic (Internet) might slow down the real time traffic, especially if end to end QoS parameters are not configured.

MPLS WAN Connectivity and De-centralized Internet Access (Internet connectivity at every branch)

De-centralized Internet Access along with MPLS Connectivity for each branch - Architecture DiagramThis WAN Connectivity architecture is similar to the previous one as each branch is connected to every other branch using MPLS circuits. But instead of having centralized Internet access, each branch has its own Internet access using Internet Leased Lines/ broadband connections. So, the inter-branch communications (ERP, VOIP, Video Conferencing, etc) travel in the MPLS circuits between the branches and the Internet traffic goes to the Internet Leased Lines from the branches itself without disturbing the MPLS circuits.
The main advantage of this architecture is, if planned well, can give the best performance for real time traffic, data traffic and Internet traffic. The users in the branches would no longer experience slow Internet access. This architecture also enables to maintain a good performance without increasing the costs too much by having broadband connections at smaller branches for Internet access instead of Internet leased lines, as broadband connections are much cheaper. This method is very effective especially if all the branches are within a single country.
The disadvantages could be the higher costs and more chances of not utilizing the bandwidth capacity paid for in each branch (for Internet Leased Lines). The costs for global MPLS connectivity is very high, and hence it is difficult to implement for companies with multiple branches across the globe.

Virtual Private Networks using Internet Leased Lines at all the branches

Virtual Private Networks using Internet Leased Lines and Routers/ UTM in all branches - Architecture DiagramThis WAN architecture is gaining a lot of traction, of late. Here, all the branches and the head office procure Internet Leased Lines and get connected to the Internet that way. A Virtual Private Network is then established using a variety of methods, with each branch connecting to all other branches securely over the Internet. For example, if Routers are used to terminate the Internet Leased Lines, then they also support a certain number of IPSec/ SSL VPN Sessions between them (two or more such devices). The number of concurrent session licenses can also be upgraded in most of the Routers. The VPN network can also be created by using UTM – Unified Threat Management devices, VPN Concentrators, Wireless LAN Controllers, etc. So, using techniques like Tunneling and Encryption, a secure network is formed over the Internet for all the inter-branch communications. The Internet traffic is allowed to go to the Internet as usual, without any encryption.
The obvious advantage of this architecture is the cost reduction as one network can do the tasks of inter-branch secure communications as well as giving Internet access, at each branch. This is architecture is especially useful for globally spread enterprises. This architecture also allows remote access of the network by workers on the field and those working from home as IPSec/ SSL VPN’s can be set up between the branches and roaming employees with proper network access credentials. The cost of Internet Leased Lines are coming down rapidly. Redundancy can be established by having multiple Internet Leased Line connections from different ISP’s and most of them give SLA – Service Level Agreements which ensures that the network is up for maximum possible time.
The main disadvantage is the performance – especially for real time applications like voice and video – The Internet is an unpredictable network and there will always be packet losses. Apart from that, there is no way of establishing End to End Quality of Service (QoS) parameters as the Internet is a public network and the connections pass through a number of Routers in between. Another disadvantage is using one connection for all the applications – if there is a lot of data traffic, the voice/video traffic gets delayed!
This article talks about the different architectures available for wide area network connectivity. You could read about the various options available for wide area network connectivity here.
What has been your experience with WAN Connectivity? Have you considered other options like 3G Networks ? Please do share your experiences in the comments section. You could also contact us using the contact form.
You could stay up to date with the various computer network technologies by subscribing to this blog – Please enter your email address in the box that’s titled “Get email updates when new articles are published” and we’ll send you the title and summary of a new article when its published.
Enterprise internet wan Link Connetivity Redundancy & load balancing


Enterprise Internet (WAN) Link Connectivity – Redundancy and Load Balancing


While taking a single 2 Mbps Internet Leased Line Link might be more cost effective than taking two 1 Mbps ILL Links from multiple service providers, the various enterprise WAN Link termination/ connectivity devices come with good redundancy and load balancing options  with multiple ILL Links, which can avoid single point failures at the most important point in the network – WAN/ Internet Gateway.

Terminating Internet (WAN) Links on a UTM Device (Unified Threat Management Device):

WAN Link redundancy and UTM device redundancy (high availability) and load balancing architecture diagramYou can terminate a WAN Link (Including Internet Leased Lines) on to a UTM (Unified Threat Management) device directly, without having to terminate it on a router first, and having the UTM device behind it. UTM’s have grown beyond just allowing termination of links – they provide device level redundancy as well as link level redundancy.
As shown in the left hand side diagram, with some UTM vendors, if two UTM devices are connected in that fashion, full device level redundancy can be achieved. That is, if one UTM device fails, the other device takes over. Mostly in such configurations, one of the devices is in passive mode./ both of them can be in active mode, as well. Its important to have such device level redundancy at the WAN gateway to avoid WAN disconnections as having just one device leads to single point of failure.
On the right hand side of the diagram, the link level redundancy and the load balancing features of the UTM devices are represented. If you have a couple of Internet links (recommended), you could terminate both of them on a UTM device (either in active-active or in active-passive mode) so that when one link fails, the Internet traffic continues to flow through the other link. If both the links are up, some vendors even allow load balancing of the Internet traffic, between them. The maximum number of links supported in this configuration can be more than just two, and depends on the UTM device vendor.
The Load balancing can be done on a per destination basis, round robin basis, percentage (50%-50%) basis or maximum threshold basis, and some vendors allow customers to choose from any of the options.

Terminating Internet (WAN) Links on a Router:

WAN device redundancy and link redundancy and link failover in Routers
Routers have been the most popular way of terminating Internet Leased Lines (and other WAN connections). So, routers have built in device level redundancy (the configuration shown in the diagram is just an example, and the connectivity may change depending on the vendor) so that even if one router fails, the Internet (WAN) traffic is forwarded through the other router. These routers can be in active-active or active-passive mode. The diagram on the right shows the link level redundancy where if one of the Internet links fail, the traffic continues to go through the other link. Load balancing can be enabled within all the links that are connected to the router.
Routers can terminate multiple types of WAN Interfaces including E1/T1/T3, DS3, FE, ADSLx (broadband), Serial, ISDN, 3G, G.SHDSL, Dial-up, etc. Many enterprise routers are modular in nature, and can accommodate specific modules at any point of time to include any of the supported WAN interfaces for that model.

Terminating Multiple Internet WAN Links on a Link Load Balancer:

Link Load Balancer architecture diagram
A Link Load Balancer is a hardware appliance which accepts multiple Internet (WAN) links from multiple service providers and allows the users to use the full capacity of all the links connected to it and fail over to other links, when a link from a particular service provider is suddenly down. This provides link level redundancy to the Internet Links terminating to an organization (assuming that each link is from a different service provider). Link Load Balancers also do load balancing of Internet (WAN) traffic across the various links connected to it, so that all the lines are optimally utilized.
Some Link Load Balancers provide even device level redundancy when two such devices are used. But this feature is available only with certain vendors. Some of them support QoS policies and bandwidth shaping policies to be applied to critical traffic like voice, video, etc to ensure that certain minimum bandwidth/ priority is allocated to real time traffic traversing over the Internet.
So, its possible to achieve both link level and device level redundancy for enterprise Internet (WAN) link connectivity to try and provide uninterrupted Internet access to all the employees, as far as possible. It is also recommended that companies use these redundancy and load balancing features for connecting WAN/ Internet links.

Mobile broadband 3g /4g LTE


A short note on 3G/4G LTE (Long Term Evolution) Mobile broadband networks


Mobile broadband networks are becoming increasingly faster and increasingly more pervasive. In this article, let us have a look at one popular technology – The 3GPP LTE (Long Term Evolution) – 3.9G/4G network which has enabled anytime/ anywhere high capacity mobile broadband access.
If you are looking to upgrade to 4G technology from 3G/3.5G today, think again! 4G technology is not available, yet. What is available in few markets (as 4G) is actually 3.9G LTE – Long Term Evolution Technology. Its also called Pre-4G technology. 4G comes with Long Term Evolution Advanced standard, which will be released shortly.
If you belong to an enterprise company, why bother about this at all – You have a huge fat pipe of Internet Leased Lines from service providers, right? Well, 3G had its share of enterprise applications. With LTE and 4G getting faster and cheaper, there is a good chance that these mobile broadband technologies might have even more applications (at the enterprise level) and replace some fixed line connections – at least in smaller/ remote branches.
So, how fast is LTE? Since this is a Pre-4G standard, the minimum data rates are –  i. 100 Mbps (Downlink peak rate), ii. 50 Mbps (Uplink peak rate). When the 4G Standard comes along (LTE Advanced), there will be data rates up to 1000 Mbps for fixed networks. The RTT (Round Trip Time) for LTE networks is (should be) less than 10 ms. So, low latency based real time applications like video and multimedia are supported on LTE networks.
LTE operates in multiple frequency bands (depending up on the continent). The commonly used frequency bands are 700/900/1800/1900/2600 Mhz. So, if you have a Quad band handset (mobile phone), there is a good chance that 4G will be supported in many countries.
LTE is forward compatible with LTE advanced standard. So, if you buy an LTE enabled mobile phone today, it would work with LTE Advanced networks of tomorrow as well, but with the speeds of LTE network.
One important aspect of an LTE network is the fact that it is an All IP network at both Core and Access levels. Even voice runs as Voice Over IP Protocol (VOIP) on LTE Networks. Because of this, LTE networks have advantages like,
  • QoS – End to End QoS (Quality of Service) settings can be applied over LTE networks to support real time applications.
  • Broadcast/ Multicast supported network.
  • Supports VPN – Virtual Private Networks.
  • LTE supports MPLS connectivity.
LTE networks uses OFDM (Orthogonal Frequency Division Multiplexing) and MIMO (Multiple In and Multiple Out) technologies to achieve cell coverage areas of around 5 to 100 KM.
LTE is a 3GPP Standard (Third Generation Partnership Project), in which a lot of telecommunications companies around the world, are a part. This enables interoperability and bulk manufacturing which decreases the overall cost of the implementation of technology.
Many devices like netbooks, laptops, tablet computers, gaming devices, etc come (or will come) with integrated LTE modules for easier access of the LTE network. Even otherwise, there are external modems/ USB dongles which can be connected, to enable LTE network access. With some vendors/ operators, it is possible to fall back to 3G/HSPA technologies in areas where there is no coverage for LTE/4G networks.
There are a lot of advantages of mobile broadband networks. Its possible to access the Internet while on the move, or from anywhere there is network coverage. There is no need (or time involved) for laying of cables to the customer premises. But there are some limitations, like the battery power (on mobile phones) that need to be improved drastically to enable prolonged access to Internet. Cost is another factor that needs to be considered – Customers may not pay more for speeds that they don’t need. It takes substantial amount of investment (on service provider side) to introduce LTE over a large area.

Accessing Internet over Power Line


Accessing Internet over Power Line

The power lines, are present in almost all the localities (including rural homes). Is it possible to access Internet through these all-reaching power lines? And more importantly, is it feasible? We’ll look at both the technology (Called as BPL – Broadband Over Power Lines / PLC – Power Line Communications) and its advantages/dis-advantages, in this article.

Is it possible to access Internet over the Power Lines?

In short, Yes. The technology for transmitting data along with power has been there for quite some time. Earlier, the SCADA signals used to be transmitted along the power lines in order to take some important readings. Now, Internet access is possible through power lines, as data (Through RF signals) can be bundled along with electric current to enable Internet access along with power, with the same power lines.
There have even been some announcements of deployments of BPL here and there. But the main reason that we do not see large scale deployments is because of the Interference issue – BPL (Broadband over Power Lines) interferes with Short wave / Low range wireless communications (Ham radio’s included).

What kind of technology is used to enable Internet over Power Lines?

The basic principle used to carry electric current and data (Through RF Signals) is that, they vibrate at different frequencies and hence don’t interfere with each other.
There are three types of Power Lines – The High Voltage Lines (that carry – Hundreds of Kilo Watts), Medium Voltage Lines (Few Kilo Watts) and Low Voltage Lines (Few hundred Watts). Power is transmitted in all the three type of lines starting from power stations to the subscriber homes.
Since power in High Voltage Lines vibrate at multiple frequencies across the spectrum, data cannot be transmitted using them. So, a separate cable (Like Optical Fiber Cable) needs to be used along this stretch to carry data, separately from the power lines.
Data can be transmitted (In the form of RF signals, the same kind used in wireless networks) over Medium Voltage lines but there is a distance limitation. So, repeaters are used to amplify these signals and they are re-transmitted from multiple locations.
Transformers convert the medium voltage current in to low voltage current that is suitable for individual home consumption. But data (RF signals) cannot travel through the transformers. Hence, some specialized equipments (like CT Couplers) are used for RF signals to bypass the transformers. From there on, they go in to the home wiring using the low voltage power lines.
Some times, wireless access points are installed in the poles itself, and the data is carried through the wireless medium (as Wi-Fi signals), in to the homes. But normally, they are taken in to homes along with the low voltage power lines.
There are power line modems that connect to the electrical power supply at one end and computers at the other – through CatV Twisted Pair Copper Cables (And RJ-45 Jacks), to enable Internet connectivity.

Are there any Standards & What are the speeds that can be achieved for Internet over Power Lines?

Earlier, it was 3.1 Mbps Internet connectivity that would be shared among multiple users. But these days, since the IEEE 1901 Standard for BPL technology has been released, speeds of up to 200/ 500 Mbps is possible and data signals can travel distances of up to 1500 meters.

What are the advantages of accessing Internet over Power Lines?

Since the power lines reach almost every home (mostly), new cables need not be laid at many locations to enable copper/ fiber based Internet connectivity. This reduces the time and cost of laying new cables. This is especially very useful in rural/ hilly areas which are not connected by copper cables for broadband access.
There are equipments available to calculate the amount of Internet bandwidth consumed by each user, over these power lines. The RF technology used to carry data over power lines is well understood and reliable. BPL technologies can be used only for the last mile connectivity, in places which are not already connected with existing cables.

What are the disadvantages of transmitting Internet over Power Lines?

The main disadvantage is the Interference caused due to the BPL technologies to Short Wave/ Low range communications, including Ham Radios. These frequencies are used even by Governments during emergencies and are reserved, in most countries. Another disadvantage is the maturity of other forms of broadband technologies.
Even in rural areas, mobile broadband technologies have started to penetrate along with copper cables (for DSL) and Satellite based Broadband access. Due to large number of subscribers for these technologies, the cost of Internet access through the alternate Internet access technologies is coming down rapidly.
If electric power is cut, the Internet (and telephony, if VOIP/ IP Telephony is used) also gets terminated. In most of the areas, power is provided using State run companies or exclusive monopoly based power companies, some of which may not be in a position to give good support/ trouble shooting.

STP , RSTP, MSTP


Understanding Spanning Tree Protocols – STP, RSTP, MSTP

STP is the short form for Spanning Tree Protocol & RSTP (Rapid Spanning Tree Protocol), MSTP (Multiple Spanning Tree Protocol) are all advanced/ improved implementations of STP. In this article, we will try to understand the basic concepts of Spanning Tree Protocols and their implementation.

What is Spanning Tree Protocol (STP) and why is it required?

Spanning Tree Protocol, and its improved versions, are required mainly for two reasons – To prevent network loops (due to multiple paths to the same destination) & to introduce redundancy in the link connections (if one link fails, the data is still routed through a different link/route).


Network loops sometimes happen inadvertently, especially in large networks. When there are two or more paths to the same destination, there is a danger of broadcast packets getting in to an infinite loop and hence causing congestion in the network. So, STP is used to identify the best path to the destination, and block all other paths (links). The blocked links are not always discarded. They are connected and kept inactive by STP, so that, when the best path fails – the next best path can be achieved by activating the blocked links.
Spanning Tree Protocol Example Diagram
Consider the above diagram. For the moment, let us concentrate on the Switch A, B & C. Switch C is connected to Switch A & Switch B via direct links. But there is another link (marked in red) that goes from Switch A to Switch B. If no Spanning Tree Protocol is applied in this scenario, there would be looping of data and hence broadcast congestion in the network.
But if STP enabled switches are employed, the link L3 is effectively blocked from transmitting any data. Its very much connected to the Switches A & B and keeps listening to the network. If either L1 or L2 links fail, this link (L3) automatically gets activated. This provides for both link redundancy and switch redundancy in the network.
Similarly, Switches C, D, E, F & G can also provide link redundancy if they are connected as shown in the above diagram & STP/RSTP enabled switches are employed.

Electing the Root:

Electing the Root bridge/ Root Switch is one important process in Spanning Tree Protocol. It is with reference to the Root Switch that all the other switches determine their best cost path. The Root Switch is the Central reference Switch. In our above diagram, Switch C could be considered as the Root bridge as it is in the central location.
Generally, the root switch is elected by selecting the switch with the lowest bridge ID. Its possible (and recommended) to manually select the root switch. If it is not selected manually, the switches will themselves elect a root switch. If the root switch fails, all the other switches repeat the election process and select a new root switch, from the available switches. The other switches in the network are called designated switches.

Link Costs:

There is a certain cost assigned to every link. For example, higher bandwidth (1000 Mbps) links that are directly connected/ close to the root are assigned a lower cost (and) lower bandwidth (10 Mbps) links that are multiple hops away from the root are assigned a higher cost. Once link costs are estimated, STP/RSTP determines the lowest cost connections from each designated switch to the root switch to determine the path with the lowest cost. It also blocks all the other higher cost links to avoid looping in the network.

BPDU Messages:

BPDU stands for Bridge Protocol Data Units. BPDU, are messages (in a certain format) that are exchanged between the switches that participate in the STP/ RSTP process. The switches pass BPDU messages between them continuously (after every two seconds, for example) to exchange their understanding of the network topology / routes/ link costs, etc. They establish the best path (least cost) connections to the root switch with the help of BPDU messages obtained from other switches.
Whenever there is a change in the network parameters (link/switch down, new link/new switch added, etc), it is detected and topology-change BPDU is sent to all the switches / switch ports by the root switch. The designated switches then adjust their filtering/ forwarding tables with this information to determine the new location/ routes to the end stations (computers).

RSTP – Rapid Spanning Tree Protocol:

The above processes are common to STP/RSTP & MSTP. With STP, the detection and reconfiguration of network topology changes (when a cable is cut/ new switch is added) takes some time – like 30-50 seconds. Since, a lot of critical / time sensitive applications are running on the LAN, this inactive period may not be acceptable. So, Rapid Spanning Tree Protocol (RSTP) was conceived to overcome this problem (RSTP takes 5-6 seconds to update and re-configure the new network topology/ routes).
In RSTP, link status of each port are monitored pro-actively (instead of waiting for the BPDU messages) to detect network topology changes. RSTP is backward compatible with STP switches.
The Switch ports that participate in RSTP have three states – Discarding (Does not accept/ forward any data but listens to BPDU messages), Learning (Once the network topology change is detected/ activation request comes via the BPDU message and filtering/ forwarding table creation is initiated) & Forwarding (RTSP ports start accepting and forwarding data packets/ frames).

MSTP – Multiple Spanning Tree Protocol:

MSTP (Multiple Spanning Tree Protocol) can map a group of VLAN’s into a single Multiple Spanning Tree instance (MSTI). Which means, the Spanning Tree Protocol is applied separately for a set of VLAN’s instead of the whole network. Different root switches and different STP parameters can be individually configured for each MSTI. So, one link can be active for one MSTI and the other link active for the second MSTI. This enables some degree of load-balancing and generally two MSTI’s are used in the network for easier implementation.

Amaravathitech.in

You could stay up to date on the various computer networking/ related IT technologies by subscribing to this blog with your email address in the sidebar box that says, ‘Get email updates when new articles are published’

The Difference Between Straight Through, Crossover, And Rollover Cables


The Difference Between Straight Through, Crossover, And Rollover Cables


There are generally three main types of networking cables: straight-through, crossover, and rollover cables. Each cable type has a distinct use, and should not be used in place of another. So how do you know which cable to use for what you need?

The Purpose of Straight-Through Cables


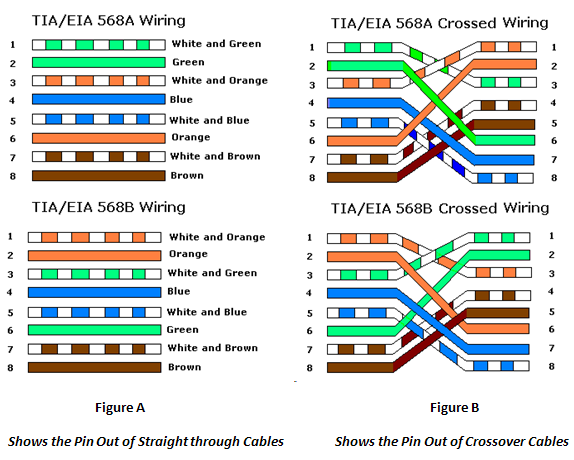
Straight-through cables get their name from how they are made. Out of the 8 pins that exist on both ends of an Ethernet cable, each pin connects to the same pin on the opposite side. Review the diagram below for a visual example:Image result for straight through cable

Notice how each wire corresponds to the same pin. This kind of wiring diagram is part of the 568A standard. The 568B standard achieves the same thing, but through different wiring. It is generally accepted to use the 568A standard as pictured, since it allows compatibility with certain telephone hardware- while 568B doesn’t.
Straight-through cables are primarily used for connecting unlike devices. A straight-through cable is typically used in the following situations:
Use a straight-through cable when:


  • 1. Connecting a router to a hub
  • 2. Connecting a computer to a swtich
  • 3. Connecting a LAN port to a switch, hub, or computer

Note that some devices such as routers will have advanced circuitry, which enables them to use both crossover and straight-through cables. In general, however, straight-through cables will not connect a computer and router because they are not “unlike devices.”


The Purpose of Crossover Cables


Crossover cables are very similar to straight-through cables, except that they have pairs of wires that crisscross. This allows for two devices to communicate at the same time. Unlike straight-through cables, we use crossover cables to connect like devices. A visual example can be seen below:
Notice how all we did was switch the orange-white and green-white wires, and then the orange and green wires. This will enable like devices to communicate. Crossover cables are typically used in the following situations:


Image result for straight through cable


 Use a crossover cable when:


  • 1. Connecting a computer to a router
  • 2. Connecting a computer to a computer
  • 3. Connecting a router to a router
  • 4. Connecting a switch to a switch
  • 5. Connecting a hub to a hub

While the rule of thumb is to use crossover cables with like devices, some devices do not follow standards. Others provide support for both types of cables. However, there is still something that both crossover and straight-through cables can’t do.

The Purpose of Rollover Cables

Rollover cables, like other cabling types, got their name from how they are wired. Rollover cables essentially have one end of the cable wired exactly opposite from the other. This essentially “rolls over” the wires- but why would we need to do such a thing? Rollover cables, also called Yost cables, usually connect a device to a router or switch’s console port. This allows a programmer to make a connection to the router or switch, and program it as needed. A visual example can be seen below:

Notice that each wire is simply “rolled over.” These types of cables are generally not used very much, so are usually colored differently from other types of cables.

Cable Testing Devices


Cable Testing Devices

It’s generally considered vital to test a cable after it is made, repaired, or otherwise interfered with. We can do this via several different types of devices.
One of the easiest solutions to testing a cable is to look at a wire map. The device will output the wire map on a screen, so that you may review it and check for the correct wiring. A wire map can also tell us is there are any short-circuits, opens, or reversed-pair faults within the wiring. If one of these faults are indeed found, you’ll need to cut off the connector and reapply a new one- this time paying more attention to the wiring process. Below you can see some of the common wiring mistakes for a straight-through cable, as viewed from a wire map.

Wire Map

Other more advanced devices may test for thing such as propagation delay. Propagation delay is a measurement of how long a signal takes to get from one point to another on a cable. Obviously if there is an abnormally long wait time, we will need to adjust the length of the cable accordingly. However, most wiring jobs do not necessarily need tests such as these, and a wire map will suffice.
One last thing to keep in mind about cable testers is that they can indeed test for crosstalk. There are several types of crosstalk, each particularly harmful to your network. It is generally a good idea to test for crosstalk, although the skilled cable maker will know how to properly install a connector, and thus, this test isn’t as vital.

The Difference between Throughput and Bandwidth


The Difference between Throughput and Bandwidth

Although bandwidth can tell us about how much information a network can move at a period of time, you’ll find that actual network speeds are much lower. We use the term throughput to refer to the actual bandwidth that is available to a network, as opposed to theoretical bandwidth.
Several different things may affect the actual bandwidth a device gets. The number of users accessing the network, the physical media, the network topology, hardware capability, and many other aspects can affect bandwidth.
To calculate data transfer speeds, we use the equation Time = Size / Theoretical Bandwidth.


Keep in mind that the above equation is actually what we use to find the “best download.” It assumes optimal network speeds and conditions since we use theoretical bandwidth. So to get a better idea on the typical download speed, we use a different equation: Time = Size / Actual Throughput.

What is Bandwidth?


  What is Bandwidth?


You probably already have a fairly good idea on what bandwidth is. It is technically defined as the amount of information that can flow through a network at a given period of time. This is, however, theoretical- the actual bandwidth available to a certain device on the network is actually referred to as throughput (which we’ll discuss further on in this section).
Bandwidth can be compared to a highway in many respects. A highway can only allow for a certain amount of vehicles before traffic becomes congested. Likewise, we refer to bandwidth as finite- it has a limit to its capability. If we accommodate the highway with multiple lanes, more traffic could get through. This also applies to networks- we could perhaps upgrade a 56K modem to a DSL modem and get much higher transfer speeds.
Bandwidth is measured in bits per second (bps). This basic unit of measurement is fairly small, however, and you’ll more than likely see bandwidth expressed as kilobits, megabits, and gigabits.
Unit Of Bandwidth
Make sure you make the distinction between bits and bytes. A megabyte is certainly not the same as a megabit, although they are abbreviated quite similarly. Since we know there are 8 bits in a byte, you can simply divide the number of bits by 8 to find the byte equivalent (or to convert from bytes to bits, multiply by 8).
Megabit megabyte
Lastly, it’s important to also make the distinction between speed and bandwidth. Bandwidth is simply how many bits we can transmit a second, not the speed at which they travel. We can use the water pipe analogy to grasp this concept further. More water could be transported by buying a larger pipe- but the speed at which the water flows is less affected.

How to Subnet a Network


How to Subnet a Network

In today's article we are going to learn about the concept of subnetting and how we can use it to divide our classful network into smaller networks that can operate in separate working zones. We'll also take a look at how we can conserve address space and save resources on process management with the use of subnetting.I'll use a few examples to clearly present the steps of subnetting and help you master this topic. And although at first this may seem difficult, don't give up! All it takes is some time and practice!

What Is Subnetting?

Subnetting is the process of stealing bits from the HOST part of an IP address in order to divide the larger network into smaller sub-networks called subnets. After subnetting, we end up with NETWORK SUBNET HOST fields. We always reserve an IP address to identify the subnet and another one to identify the broadcast address within the subnet. In the following sections you will find out how all this is possible.

Why Use Subnetting?

Conservation of IP addresses: Imagine having a network of 20 hosts. Using a Class C network will waste a lot of IP addresses (254-20=234). Breaking up large networks into smaller parts would be more efficient and would conserve a great amount of addresses.
Reduced network traffic: The smaller networks created the smaller broadcast domains are formed hence less broadcast traffic on network boundaries.
Simplification: Breaking large networks into smaller ones could simplify fault troubleshooting by isolating network problems down to their specific existence.

The Subnetting Concept

You will be surprised how easy the concept of Subnetting really is. Imagine a network with a total of 256 addresses (a Class C network). One of these addresses is used to identify the network address and another one is used to identify the broadcast address on the network. Therefore, we are left with 254 addresses available for addressing hosts.
If we take all these addresses and divide them equally into 8 different subnets we still keep the total number of original addresses, but we have now split them into 8 subnets with 32 addresses in each. Each new subnet needs to dedicate 2 addresses for the subnet and broadcast address within the subnet.
The result is that we eventually come up with 8 subnets, each one possessing 30 addresses available for hosts. You can see that the total amount of addressable hosts is reduced (240 instead of 254) but better management of addressing space is gained. I'll now use a couple of examples to help explain the process of subnetting as clearly as possible.

Subnetting a Class C Address Using the Binary Method

We will use a Class C address which takes 5 bits from the Host field for subnetting and leaves 3 bits for defining hosts as shown in figure 1 below. Having 5 bits available for defining subnets means that we can have up to 32 (2^5) different subnets.
It should be noted that in the past using subnet zero (00000---) and all-ones subnet (11111---) was not allowed. This is not true nowadays. Since Cisco IOS Software Release 12.0 the entire address space including all possible subnets is explicitly allowed.
Cisco Subnetting 1
Let's use IP address 192.168.10.44 with subnet mask 255.255.255.248 or /29.

STEP 1: Convert to Binary

Cisco Subnetting 2

STEP 2: Calculate the Subnet Address

To calculate the Subnets IP Address you need to perform a bit-wise AND operation (1+1=1, 1+0 or 0+1 =0, 0+0=0) on the host IP address and subnet mask. The result is the subnet address in which the host is situated.
Cisco Subnetting 3

STEP 3: Find Host Range

We know already that for subnetting this Class C address we have borrowed 5 bits from the Host field. These 5 bits are used to identify the subnets. The remaining 3 bits are used for defining hosts within a particular subnet.
The Subnet address is identified by all 0 bits in the Host part of the address. The first host within the subnet is identified by all 0s and a 1. The last host is identified by all 1s and a 0. The broadcast address is the all 1s. Now, we move to the next subnet and the process is repeated the same way. The following diagram clearly illustrates this process:
Cisco Subnetting 4

STEP 4: Calculate the Total Number of Subnets and Hosts Per Subnet

Knowing the number of Subnet and Host bits we can now calculate the total number of possible subnets and the total number of hosts per subnet. We assume in our calculations that all-zeros and all-ones subnets can be used. The following diagram illustrated the calculation steps.
Cisco Subnetting 5

Subnetting a Class C Address Using the Fast Way

Now let's see how we can subnet the same Class C address using a faster method. Let's again use the IP address 192.168.10.44 with subnet mask 255.255.255.248 (/29). The steps to perform this task are the following:
1. Total number of subnets: Using the subnet mask 255.255.255.248, number value 248 (11111000) indicates that 5 bits are used to identify the subnet. To find the total number of subnets available simply raise 2 to the power of 5 (2^5) and you will find that the result is 32 subnets.
Note that if subnet all-zeros is not used then we are left with 31 subnets and if also all-ones subnet is not used then we finally have 30 subnets.
2. Hosts per subnet: 3 bits are left to identify the host therefore the total number of hosts per subnet is 2 to the power of 3 minus 2 (1 address for subnet address and another one for the broadcast address)(2^3-2) which equals to 6 hosts per subnet.
3. Subnets, hosts and broadcast addresses per subnet: To find the valid subnets for this specific subnet mask you have to subtract 248 from the value 256 (256-248=8) which is the first available subnet address.
Actually the first available one is the subnet-zero which we explicitly note. Next subnet address is 8+8=16, next one is 16+8=24 and this goes on until we reach value 248. The following table provides all the calculated information.
Note that our IP address (192.168.10.44) lies in subnet 192.168.10.40.
Cisco Subnetting 6

Test Your Subnetting Knowledge and Practice, Practice, Practice!

Don't get discouraged if you didn't understand every little detail I went over in this article. Subnetting is not really that difficult, but it does require a bit of practice.
Start with testing your knowledge of subnets and make sure you feel confident about this before you move on to designing your own subnets. But remember, if you're on the Cisco Networking track you will have to deal with subnetting sooner or later, so grab this opportunity and start testing yourself.
Go ahead and subnet the network address 192.168.10.0 address using the subnet mask 255.255.255.192 (/26). Find the valid subnets, host ranges and broadcast addresses per subnet. If you want to double-check your answer, feel free to leave me a comment and I will provide you with the correct solution.

An Introduction to Ethernet Switching


An Introduction to Ethernet Switching


When you stop to think how well the internet is put together, you start to wonder how the internet coexists with all the chaos that results from broadcasts, data collision, and data loops. Yet, despite the odds, the internet is still (currently) alive and thriving today. But what can we attribute this achievement to? As you’ll find in the coming section, we owe a lot of gratitude towards a little something Cisco likes to call Ethernet switching.
But before we jump into the fun theories such as Spanning Tree Protocol (STP), let’s take a look at the devices we are dealing with.

Layer 2 Bridges

As you’ll recall from the OSI model, layer 2 corresponds to the Data Link layer- the layer that deals directly with MAC addresses. In this case, we are dealing with bridges that, coincidentally, handle MAC addresses.
The purpose of a bridge is simple: divide a network into two separate pieces so we can save bandwidth. That way if a computer on one segment of the bridge needs to communicate with another computer on that side of the bridge, the connection remains local. The other segment will not be bothered with the request.
This also effectively gives us two separate collision domains. This will help cut down on data collision, which is a major cause of network latency. Note that in the above example, computer A sends information to the bridge first, which makes the decision to route the request to computer B, while filtering the data out of the segment on the right.
Things to Remember About Bridges

  • 1. Bridges provide switching via comparing destination MAC addresses found in the data being sent to MAC addresses stored in its tables.
  • 2. If the source MAC address is not already known, the bridge creates a new entry in the MAC address table with the source port. This will be used for future switching operation.
  • 3. If the destination MAC address is not known by the bridge, a broadcast will be sent to all segments in a process called flooding. Note that a broadcast is not sent out in the port the data was received on.
  • 4. If the bridge determines the destination MAC address is not from the same network segment as the sending device, it will forward the data to the appropriate segment.

Layer 2 Switches

Layer 2 switches are essentially the same as bridges, only they have multiple ports and can use microsegmentation to decrease collisions and increase throughput. They also have support for full-duplex operation and spanning tree protocol (STP).
Full-duplex operation enables devices to have support for both receiving and sending information at the same time. This eliminates the problem of data collision altogether. Keep in mind that if a device such as a hub were used, full duplex operation could not be possible because hubs lack microsegmentation.
Lastly, switches use what is called spanning tree protocol. Spanning tree protocol is used to help prevent loops from forming. Imagine that switch A forwards data to switch B, since it is unsure where the data should go. Switch B isn’t sure either, and forwards the data back. This creates a never ending loop in theory, but thankfully we can make use of STP. In the example below, you can see that there are four physical links maintained, while two of the links are purely logical- they do not technically exist to the switches.

To counteract the threat of loops, switches send messages called bridge protocol data units, or BPDUs, out every port to let other switches know if its existences. Redundant paths are then shut down through port blocking, and we result with a path free of loops. (These paths can be opened again, however, in case a line goes down and the redundancy is needed.) In the example below, you can see that there are four physical links maintained, while two of the links are purely logical- they do not technically exist to the switches.

Layer 2 Switch Modes of Operation

But what sets them apart from bridges even further is that they can operate in three different modes- Store-and-Forward, Cut-Through, and Fragment-Free.

  • 1. Store-and-Forward is the method with the slowest operation speed. This is due to the fact that it checks incoming frames of data for integrity. If the frame has errors, it is discarded. Otherwise, it is sent to its destination. This error checking can be quite costly to network performance, however.
  • 2. Cut-Through switching is considered to be the bare minimum- and thus much faster. It only requires that the beginnings of the frame up to the destination MAC address be read before the frame of data can pass through the switch.
  • 3. Fragment-Free switching is a modified form of the Cut-Through method. Fragment-free switching filters out collision fragments, which is where the majority of packets errors originate. To do this checking, the switch must wait for the entire packet of information to be received before the filtering takes place. Obviously, it’ll not be as quick as the cut-through method.

A Last Note on Broadcasts and Collisions

Keep in mind that since we have been dealing with layer 2 devices, we do not divide the broadcast domain with these devices. Only a router can divide a broadcast domain. As for collision domains, each of these devices creates more of them (this is a good thing). As for hubs and repeaters, they only extend the collision domain.
Also keep in mind that if a frame is bearing the format of FFFF.FFFF.FFFF, it will be automatically received by all NICs on the network, as this is, in fact, a broadcast address in hexadecimal.

Notes on Fiber Optic Media

Notes on Fiber Optic Media


If you’ve worked with fiber optics, you know that optical fiber is resistant to noise and outside interference- unlike copper. Thus, we only have one concern when dealing with fiber optic cable: keeping the signal strength strong. Since we don’t have to 
worry about interference, we can cable fiber optic media much farther than twisted-pair cable.

We noted earlier that computers communicate with high values and low values. However, it would be more accurate to claim that they instead communicate via “on” and “off” indications. Fiber optic media uses light to signal this on or off state.
You’ll generally want to use fiber optic cable when copper media proves to be too limited for long distances, or noisy environments. It may cost a little more, but the speed and efficiency fiber optic cable provides is well worth it. And in longer cable runs, fiber optic cable will actually cost less than copper media.


How to Avoid Signal Attenuation


How to Avoid Signal Attenuation

Attenuation is the decrease in signal amplitude. If we have a small signal, it becomes increasingly harder to decipher the signal. Much like a yell is easier to understand that a faint whisper, computers appreciate healthy signal amplitudes.

Signal Attenuation

You’ll notice in the above diagram that as distance increases, amplitude decreases. This becomes a problem since computers communicate in this instance via two values; high values and low values. Since the high value becomes increasingly similar to a low value, the signal will eventually become worthless for communication.
Several factors create attenuation- mostly resistance in the copper wire and leaked signal energy. So to fix the problem, we try to stick with the recommended cable lengths. If you indeed need a longer cable run, you may clean the signal by adding a repeater, switch, router, or other devices to your network so that the signal can be regenerated.
It’s also important to note that as frequency (the number of cycles a second) increases, so does the noise and interference.

How to Avoid Crosstalk


How to Avoid Crosstalk


You’ll come to find that the most common mistakes are usually the simplest to avoid. For instance, cross talk is very commonly created when connectors are not installed properly at both ends of the cable. Cross talk is the effect we get when electromagnetic energy from one cable leaves an imprint on adjacent cables. (You’ll often see this referred to as “noise.”)This usually isn’t a problem, however, since we twist wires inside Ethernet cable to cancel out this effect. So how, then, does cross talk become such a problem?

Cross Talk

You’ll notice that the Ethernet cable on the right has too much wire left over- we actually need to crimp the connector to the point where no internal wiring is visible. It’s important to note that while the wires do need to be separated to properly install a connector, they should only be separated as little as possible. Otherwise the lack of cancellation will create cross talk- and possibly cause hard-to-track failures in a network.